Дизайн
Как могу загрузить дизайн после размещения заказа?Вы можете добавить дизайн в течение 24 часов с момента размещения заказа, в противном случае дата доставки изменится.
- Перейдите на страницу истории заказов.
- Добавьте файл дизайна или Google Drive/Dropbox ссылку в окне сообщений, нажмите кнопку Отправить и наша команда дизайнеров ответит вам в течение 6 рабочих часов
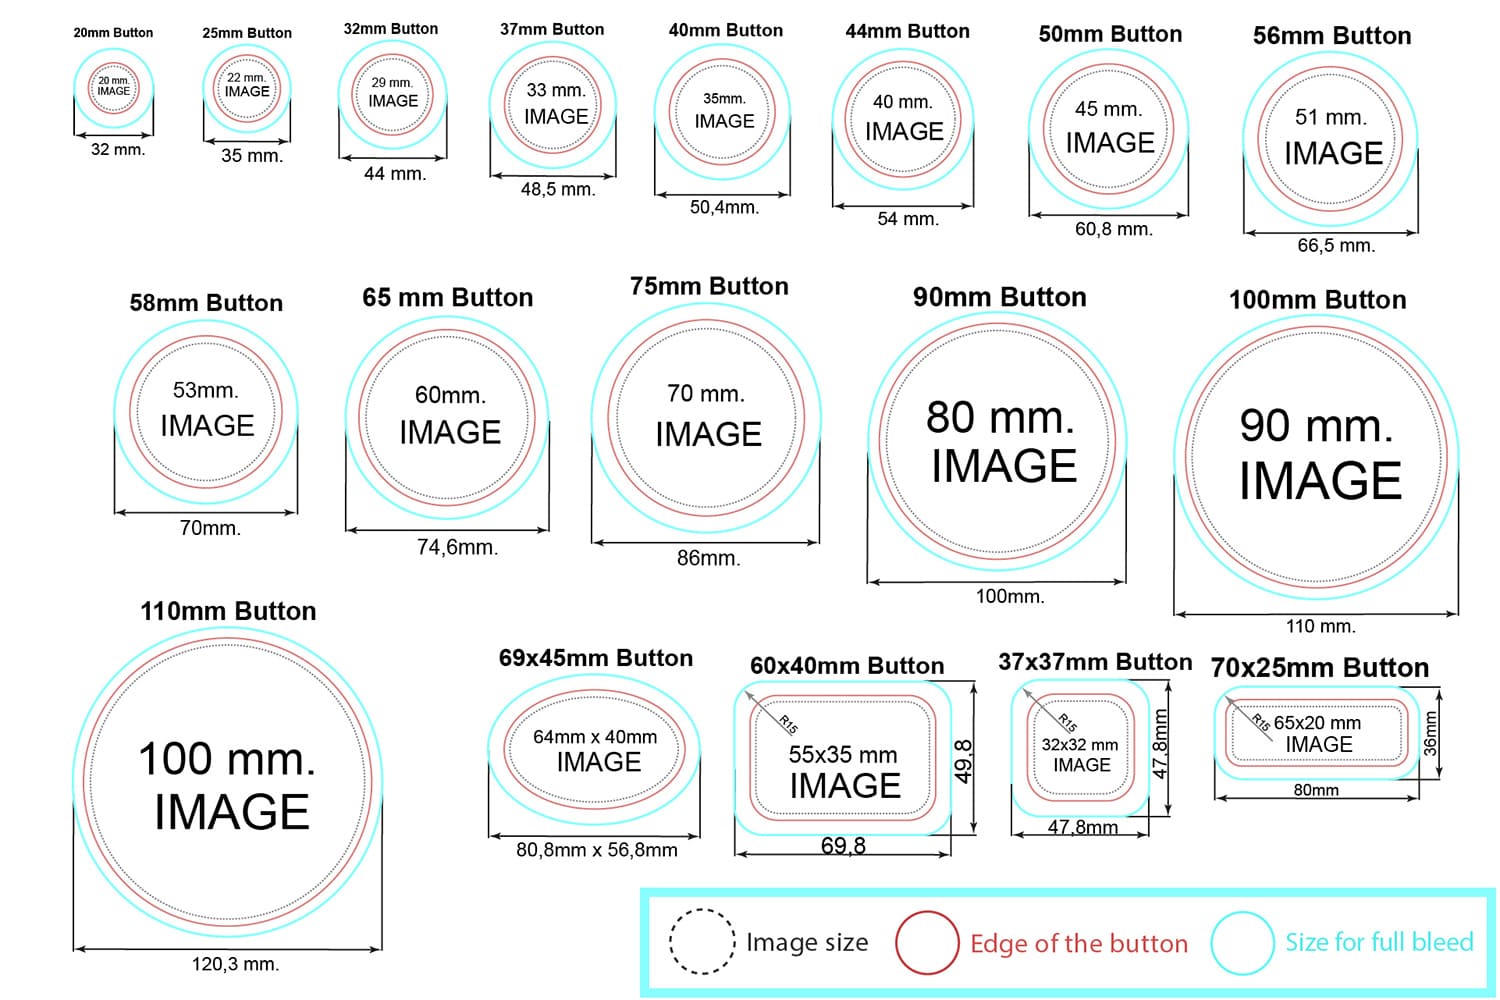
Когда графика продолжается до края листа бумаги, требуется внести изменения. Это связано с тем, что коммерческий печатный принтер не может печатать края листа бумаги. Вместо этого несколько изображений печатаются на гораздо больших листах бумаги, а затем уменьшаются до нужного размера.
Невозможна ровная обрезка до краев вашего дизайна, необходимо немного перепечатывать с каждой стороны. Этот оттиск называется «припуск под обрез». Любой документ, который печатается профессионально, потребует припуска обрезки и безопасной зоны, обеспечивающей распечатку по краям документа.
Будут ли цвета одинаковыми на моем экране и на печатных материалах?Большинство людей удивляются тому, насколько хорошо их напечатанный дизайн соответствует тому, что они видят на экране. Но из-за значительных различий в калибровке монитора и разных используемых технологий некоторые печатные цвета могут не совсем соответствовать цветам вашего монитора.
Будете ли вы проверять орфографию в моих дизайнах?Конечно, нет. Все орфографические ошибки должны всегда проверяться вами перед отправкой нам дизайна.
Есть ли цвета, которые я не должен использовать в своем дизайне?Мы делаем все возможное, чтобы напечатать ваши цвета именно так, как вы хотите, но есть ряд цветов, где риск отклонения цвета выше, чем у других цветов. Особенно в оранжевом и пурпурно-синем цветах, есть вероятность, что цвет цифровой версии дизайна не совсем будет соответствовать цвету вашей печатной версии. Эти цвета трудно смешать на печатной машине. В дополнение к этому, некоторые цвета, которые выглядят голубыми на вашем экране, могут печататься слегка фиолетовыми, если в цвете также используется пурпурный цвет. Мы рады всегда помочь и дать вам совет как сделать, чтобы ваша печать выглядела именно так, как вы этого хотите.
Как я могу проверить, имеют ли мои изображения/дизайн высокое разрешение?Стандартное разрешение печати составляет 300 точек на дюйм. Лучший способ проверить, хорошее ли у вас изображение - это приблизить изображение очень близко и просмотреть изображение с увеличением около 200%. Если ваше изображение очень неровное и размытое, оно будет так отображаться и на печати. Всегда используйте оригинальные высококачественные изображения для печати ваших дизайнов. При этом, не думайте, что разрешения достаточно для качественной печати, если настройки установлены на 300 точек на дюйм. Возможно, вы используете изображения, логотипы или тексты в вашем дизайне, которые изначально низкого качества. Чтобы избежать этого, мы рекомендуем вам использовать оригинальные файлы и никогда не использовать изображения или логотипы из Интернета.
Не удалось загрузить мой файл дизайна на Poznachka.com- Загрузите файл дизайна в любое облачное хранилище, например, на диск Google, Dropbox или Wetransfer. Скопируйте ссылку.
- Перейдите на страницу истории заказов.
- Выберите работу, в которую вам нужно добавить файл дизайна.
- Добавьте файл дизайна или Google Drive/Dropbox ссылку в окне сообщений
Мы рекомендуем минимальный размер шрифта 6 пунктов. Любой шрифт меньшего размера будет чрезвычайно трудно читать после печати. Все, что меньше, будет напечатано на ваш страх и риск.
CMYK vs RGB печатьВы когда-нибудь настраивали цвета дизайна на компьютере, а потом, после печати, разочаровывались как это выглядит ужасно, темно и грязно?
Это потому, что ваш экран состоит из множества кластеров, состоящих из трех маленьких лампочек, которые называются светодиодами в цветах: красный (R), зеленый (G) и синий (B). Ваш глаз обманывает вас, смешивая эти три источника света, чтобы получить сплошной цвет, и в зависимости от того, насколько ярко они освещены, цвет будет различаться.
Что такое простой черный, а что насыщенный черный?В общем случае вы можете разбить черный цвет на две категории: простой, сплошной цвет (например, Pantone или отдельные цвета) или смешаный черный, тогда как сочетание цветов называется насыщенным черным.
Часто может быть трудно увидеть разницу цветов при подготовке файлов на экране монитора, поскольку на экранах ПК более насыщенные RGB цвета. Поэтому целесообразно сделать пробный печатный вариант блоков черного цвета.
Смешивание большого количества цветов на бумаге приведет к потере качества изображения на бумаге, и если вам повезет не размазать чернила, вам
придется ждать, пока они высохнут как минимум в три раза дольше, чем обычно.
Если у вас в дизайне используется мелкий, тонкий текст, НАСТОЯТЕЛЬНО рекомендуется, чтобы вы не использовали насыщенный черный на ваших изображениях.
Как выглядят градиенты на печати?Градиенты могут быть представлены в векторном виде или преобразованы в растровый. Независимо от того, созданы ли они изначально как растры или векторы, градиенты насыщеностью ниже 10% могут не воспроизводиться точно.
Какая гарантия точности цветопередачи?Невозможно гарантировать 100% точность цветопередачи. Однако вы можете максимизировать качество цвета, гарантируя, что все представленные вами файлы находятся в режиме цвета CMYK и что для требуемого соответствия цветов установлена правильная калибровка цвета. Когда эти четыре цвета (все вместе известные как CMYK) объединяются, они могут давать миллионы различных оттенков. Изменение процентного содержания одного цвета может существенно повлиять на общий цвет. Черный (K), четвертый процессный цвет, часто используется для затемнения цветов, созданных тремя другими цветовыми процессами CMYK.
Как работать с текстом?Текст, логотипы и другой критически важный контент всегда должны быть внутри синей строки «безопасности». Поскольку процесс резки не является на 100% точным, все, что выходит за рамки этой области, может быть обрезано.
Какие форматы файлов мы принимаем?Мы принимаем: AI, CDR, PDF, TIFF
Важно:
- При сохранении PDF-файла обязательно используйте PDF 1.6.
- При сохранении файла TIFF, пожалуйста, объедините все слои в один слой.
Процесс резки печатных материалов имеет механический допуск около 1,5 мм. При создании рамки вашей иллюстрации важно, чтобы ваш дизайн имел не менее 3 мм белого пространства от границы страницы.
Размер макета для заказа значка
